There is something satisfying about opening a laptop, Chromebook, or tablet from basically anywhere and connecting back to your own Windows machine like it is sitting right in front of you. Not a rented cloud desktop. Not a monthly virtual PC subscription. Your own VM, running on your own hardware, in your own environment, under your control.
That was the goal behind this setup.
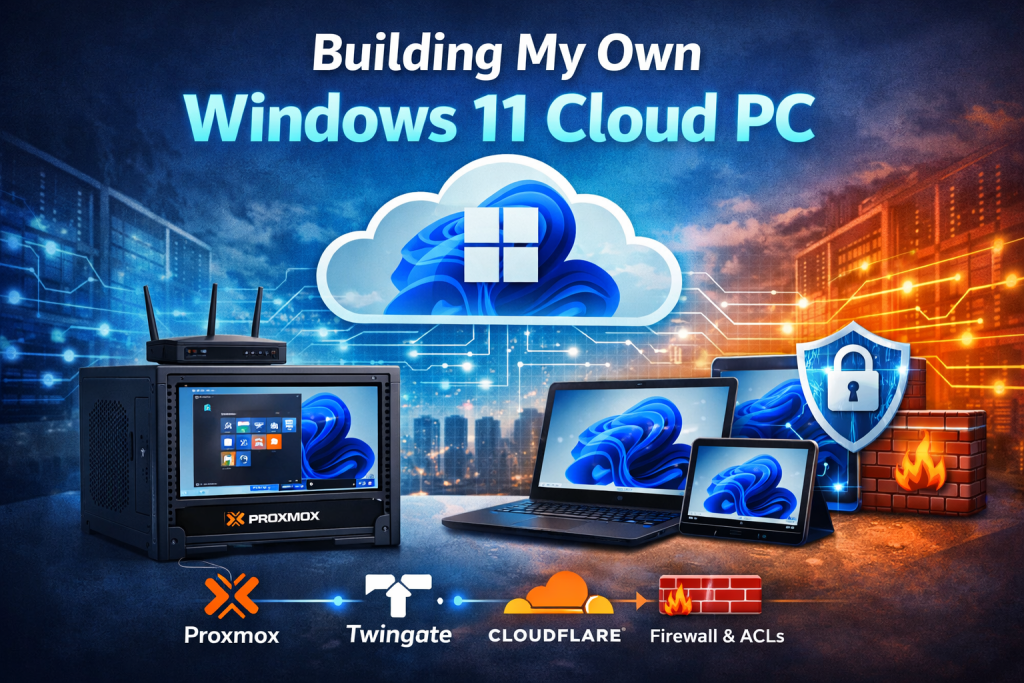
I wanted a Windows 11 virtual machine hosted in my homelab that I could securely access from anywhere using different devices. I also wanted it to feel practical, not overly complicated. I did not want to just throw RDP open to the internet and hope for the best. I wanted layers: Proxmox for virtualization, router ACL and firewall rules to segment and protect traffic, Twingate for secure private access, and Cloudflare as a controlled fallback option.
This post walks through how I built it, why I designed it the way I did, and what I learned along the way.
Why I Built This
I wanted a Windows 11 environment that was always available no matter what device I had with me. Sometimes that might be another laptop. Sometimes a Chromebook. Sometimes a tablet. The idea was simple: make one reliable Windows workspace that lives in my own infrastructure and can follow me anywhere.
A setup like this is useful for a lot of reasons. Maybe you need access to Windows-only software when you are away from your main machine. Maybe you want a controlled remote workspace for admin tasks. Maybe you just like the idea of building your own private cloud instead of depending completely on third-party platforms.
For me, it was also about learning. This project touches networking, security, virtualization, remote access, and real-world troubleshooting all at once.
The High-Level Design
At the center of everything was Proxmox. That is where the Windows 11 VM lives. Proxmox gave me an easy way to manage the virtual machine, assign resources, snapshot it, and keep the whole setup flexible.
From there, I built secure access around it using multiple layers:
- Proxmox hosted the Windows 11 VM
- Router ACLs and firewall rules controlled what could talk to what
- Twingate gave me private remote access without exposing the VM directly to the public internet
- Cloudflare gave me an additional remote access path for browser-based or web-published access when needed
The big idea was that no single component carried the whole security burden. Each layer had a job.
Step 1: Building the Windows 11 VM in Proxmox
The first part was straightforward: create a Windows 11 virtual machine inside Proxmox.
I allocated the VM like I would for a real daily-use machine, not just a test box. That meant enough CPU, RAM, and storage to make Windows feel responsive. Once Windows 11 was installed, I treated it like a normal endpoint: updates, remote access configuration, user account setup, and baseline hardening.
One of the best things about hosting Windows in Proxmox is the flexibility. If I need to make changes, I can snapshot first. If I break something, I can roll back. If I want to move storage or adjust resources later, I have options. That is one of the reasons I like running this kind of setup myself.
At this point, I had a working Windows 11 VM on my internal network, but it was still just that: internal.
Step 2: Network Placement Matters More Than People Think
A lot of people jump straight to remote access tools, but the networking decisions matter just as much as the VM itself.
I did not want this Windows VM to sit in a flat network where everything could reach everything else. That is where router ACLs and firewall rules came in. I wanted to control access intentionally.
The VM needed a predictable IP address, so I treated it like an important internal host. Whether you use a DHCP reservation or a static IP, the goal is the same: make sure the machine’s address does not change unexpectedly.
Once that was done, I used router policy and firewall rules to limit who could reach the VM and on what ports. That way, even inside the local environment, access was narrowed down instead of left wide open.
That part is easy to overlook, but it is one of the most important parts of the build. Security does not start at the edge. It starts with internal design.
Step 3: Using Twingate for the Main Access Path
This is where the setup really started to feel clean.
Instead of exposing Remote Desktop directly to the internet, I used Twingate as the primary access method. That let me create a private access path into my network without traditional port forwarding.
From the user side, this is what makes the setup feel modern. I can install the Twingate client on another laptop, a Chromebook, or a tablet, authenticate, and then securely reach internal resources as if I were on the private network. That means I can connect to the Windows 11 VM over a protected path instead of advertising RDP to the entire internet.
That was exactly what I wanted.
Rather than saying, “Here is my public IP and an open port, please do not attack it,” I was saying, “Only authenticated devices and users inside this private overlay get access.”
That is a very different security posture.
Why Twingate Was the Better Choice
For a remote Windows VM, Twingate made more sense than just opening services publicly.
It helped solve a few big problems:
First, it reduced exposure.
The VM did not need to be openly reachable from the internet just for me to use it remotely.
Second, it worked across different device types.
That mattered because this project was not just about connecting from one Windows laptop. I wanted options.
Third, it fit the zero trust mindset better than old-school remote access.
Instead of trusting the network itself, access is based more on identity and policy.
That made the setup feel less like a risky home lab experiment and more like something designed on purpose.
Step 4: Cloudflare as a Fallback Option
Twingate became my main access method, but I also wanted a fallback.
That is where Cloudflare came in.
In a home or lab setup, it is smart to avoid relying on only one remote access path. If I need browser-based access for a specific tool, or I want a secondary route available for certain workflows, Cloudflare gives me that flexibility.
The important part here is that I did not treat Cloudflare like a shortcut around security. I treated it as a controlled secondary access layer. The goal was not to make everything public. The goal was to selectively publish only what made sense, while keeping the Windows VM itself protected behind the rest of the design.
That distinction matters a lot.
Too many setups become insecure because “temporary remote access” turns into permanent public exposure. I wanted the opposite. I wanted convenience, but with boundaries.
Step 5: Locking Things Down with ACLs and Firewall Rules
This is where the project went from functional to responsible.
A Windows VM that is accessible from anywhere sounds cool, but only if access is controlled tightly. I used router ACL and firewall rules to define what was allowed instead of assuming the remote access tools alone were enough.
The basic mindset was:
- allow only the traffic I actually need
- avoid broad internal access where possible
- separate management traffic from regular client traffic
- keep remote access paths intentional and limited
That means thinking through questions like:
Can just any device on the network reach the VM?
Can the VM freely reach everything else?
Are only specific ports allowed?
Do I have a fallback path that does not accidentally bypass my main security model?
This is where a lot of DIY cloud builds go wrong. People spend time getting things to work, but not enough time deciding what should not work. In my case, the ACL and firewall layer helped make sure the VM was reachable where it needed to be and restricted everywhere else.
Step 6: Testing from Real Devices
Once the pieces were in place, I started testing from actual devices instead of just assuming it was good.
That meant trying to reach the Windows 11 VM from another laptop, from a Chromebook-style workflow, and from a tablet. This was important because “remote access works” can mean very different things depending on the device.
A full laptop gives you the closest experience to sitting at a Windows PC. A Chromebook or tablet is more of a usability test. Can you log in cleanly? Does the session feel responsive? Can you actually work inside it?
That kind of real-world testing tells you more than a basic ping or connection check ever will.
It also helps uncover where your setup needs refinement, whether that is networking, authentication flow, client compatibility, or just making the desktop easier to use remotely.
What I Liked About This Setup
The best part of this project is that it feels like having a personal cloud PC without giving up ownership of the hardware and environment.
My Windows 11 VM lives on infrastructure I control. I can manage it from Proxmox, protect it with network policy, and access it remotely in a way that is much cleaner than just forwarding RDP to the internet.
It also scales nicely from a learning project into something genuinely useful. This is not just a lab demo. A setup like this can become part of your normal workflow.
Another big benefit is flexibility. I can improve any part of it over time. I can harden the Windows guest more, tune Proxmox performance, refine router rules, or adjust the balance between Twingate and Cloudflare depending on how I want to access it.
Challenges I Ran Into
No project like this is completely smooth.
The hard part is not usually spinning up the VM. The hard part is getting all the moving pieces to work together in a secure and predictable way. Remote access tools, local routing, firewall rules, DNS behavior, device compatibility, and virtualization settings can all affect the outcome.
That is why I like projects like this. They force you to think beyond just one product or one dashboard. You have to understand how the stack works as a system.
And when it finally works, it is worth it.
Final Thoughts
Building my own Windows 11 VM in my own cloud ended up being one of those projects that is both useful and educational. I now have a Windows workspace hosted in Proxmox that I can access from different devices, from different places, without depending entirely on a public-facing setup.
The real strength of it is not any single tool. It is the combination.
Proxmox gave me the platform.
Twingate gave me secure private access.
Cloudflare gave me a backup path and added flexibility.
Router ACLs and firewall rules gave me control over how the whole thing behaves.
That combination turned a simple VM into something much closer to a private cloud desktop.
And honestly, that is the part I like most. It is mine. I built it, I understand it, and I can improve it whenever I want.